
OpenCart Google reCaptcha extension let store admin allow its clients to pass through human verification test without providing extra inputs on the website. Moreover, the OpenCart Google reCaptcha extension store merchants can offer free registration to the customers on the websites. Including Gmail, Hotmail, Facebook, Twitter, etc.
More important, Opencart Google Captcha makes sure that certain activities are submitted by people, not bots.
Also, beginners who are new to the eCommerce store build-up and looking for guidance on how to install the Google ReCaptcha on their OpenCart store need to scroll down.
Installation Guide
Before beginning the installation process, you need to purchase the Opencart Google Captcha module from the Knowband store. Once bought, you will get the following files on your enlisted email.
- Source code of Opencart Google Captcha in zipped file format
- User Manual of Opencart Google Captcha extension
Installation steps :
1. Unzip the zip file.
2. Copy all the folders of the zip file in the Root Directory of OpenCart setup via FTP manager.
Steps to install Ocmod file using Extension Installer
1. Now, click on the Extension Installer window from the admin panel and click on the upload button to search. Then upload the install.ocmod.xml file.
3. You will also see a success message on your screen once uploaded.
4. Once installed, it’s ready to use at your store. Go to the admin menu, click on the extensions, and then click on Captchas. Later, click on the Edit button which is next to Google reCaptcha.
Admin Interface
Opencart Google reCaptcha comes in two versions- version 2 and version 3 reCaptcha. Once this module is successfully installed, you can implement version 2 and version 3 reCaptcha according to business needs.
Settings:
Admin Panel > Extensions > Captchas > Google reCaptcha.
Sections:
The admin interface of the Opencart human verification extension is divided into three sections:
1. General Settings
2. v2 reCaptcha Settings
3. v3 reCaptcha Settings
General settings:
- Status: Activate or deactivate the complete reCaptcha system from your website.
- Enable Google reCaptcha for: You can choose the pages on which you want to enable the reCaptcha feature.
- Login Page: This allows you to select the type for login page – v2 reCaptcha or v3 reCaptcha.
- Registration Page: This allows you to select the type for the registration page- v2 reCaptcha or v3 reCaptcha.
- reCaptcha for Contact Page: This allows you to select the type for a contact page – v2 reCaptcha or v3 reCaptcha.
- Forgotten Password Page: This allows you to select the type for forgotten password page- v2 reCaptcha or v3 reCaptcha.
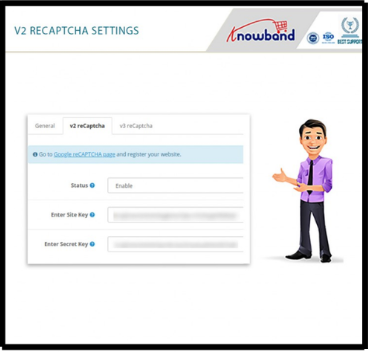
v2 reCaptcha Settings
You can set the site key and secret key for the v2 reCaptcha system under this section of the Opencart Google Captcha module.
- Status: Enable or disable the status of reCaptcha version 2 with the help of this option.
- Enter Site Key: Enter the key of version 2 reCaptcha using the “Enter Site Key” option.
- Enter Secret Key: Enter the secret client ID of version 2 reCaptcha with the “Enter Secret Key” option.
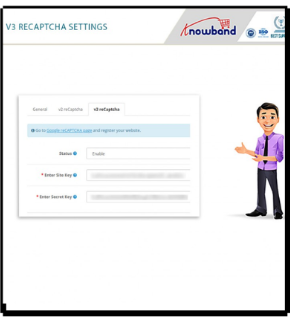
v3 reCaptcha Settings
- Status: Enable or disable the status of reCaptcha version 3 using this option.
- Enter Site Key: This allows you to enter the key of version 3 reCaptcha using “Enter Site Key”.
- Enter Secret Key: Enter the secret client ID of version 3 reCaptcha using “Enter Secret Key”.
Note: Once you have selected the reCaptcha type as version 2, the site key and secret key for version 2 reCaptcha must be filled into fields. Otherwise, you will get an error message. A similar thing is applied to version 3 reCaptcha.
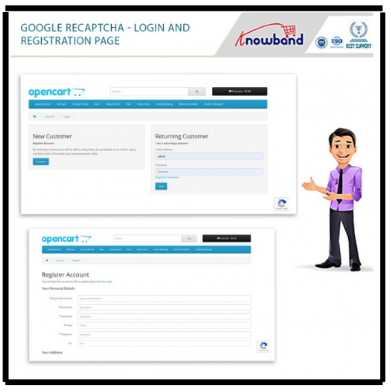
On the other hand, the front Interface of the store both- the version of v2 reCaptcha and v3 reCaptcha can be found on pages. For instance, login pages, registration page, contact page and forgot password page.


